


6. Editing Program Code
Program code is edited in Source windows. The Source window is a full-featured text editor, with many options and features particularly useful when editing C and C++ source code. Subsets of Source window functionality are also available in the Source pane of the Class Editor and in the Source child window of the Hierarchy Editor.In addition to its role in editing project code, use the Source window for monitoring program execution while debugging. See Chapter 24, Commands Available in Debugging Mode, for more information.
Chapter 21, Text Editor Reference, contains descriptions of all Source window menu commands, toolbar icons, dialog boxes, and options. Refer to it once you've read this chapter and you need more details about specific aspects of the editor.
Refer to the Digital Mars C++ IDDE Help for the key combination used to execute a particular editting command. It contains a reference to all key combinations for every key binding set.
Role of the Text Editor
The purpose of the IDDE text editor is to create, examine, and modify project source files. Because these files are standard text files, any text editor to work with them. However, the IDDE text editor is designed especially to edit C and C++ source files and to work in concert with other IDDE tools.Anyone familiar with Windows can get started quickly with the IDDE text editor because it uses standard Windows editing commands. In addition, the text editor has some features that make working with C and C++ files easier. For example, the editor can automatically indent or unindent after braces and can check delimiters.
The text editor can display keywords, preprocessor directives, and comments in special font styles and colors. This technique helps track errors in source code while editing. For example, an unmatched comment (/* without a matching */) turns a large part of the code a different color, making it obvious where the problem lies. Keywords and preprocessor directives are easier to spot when they are in a different color or font style. Misspelled keywords can be caught immediately when they remain displayed in the default font.
Source windows are an integral part of the IDDE environment and work together with other IDDE windows to make application development easier. For example, the IDDE automatically saves all files open in Source windows when you rebuild your project. During compilation, error messages are displayed in the Output window; double-clicking on an error message opens a Source window on the corresponding source file, if necessary, and then jumps to the line in the source code that caused the error.
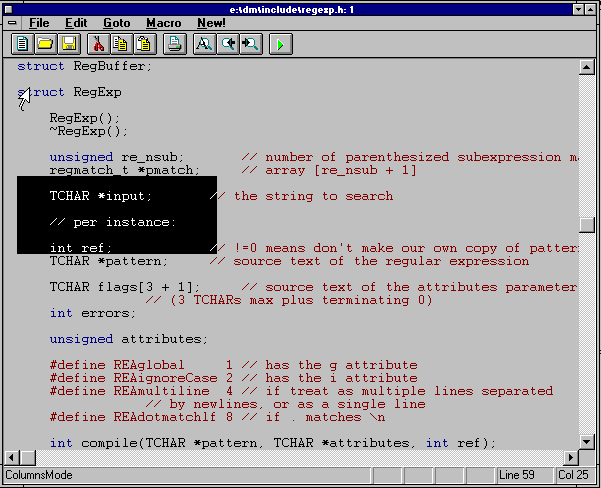
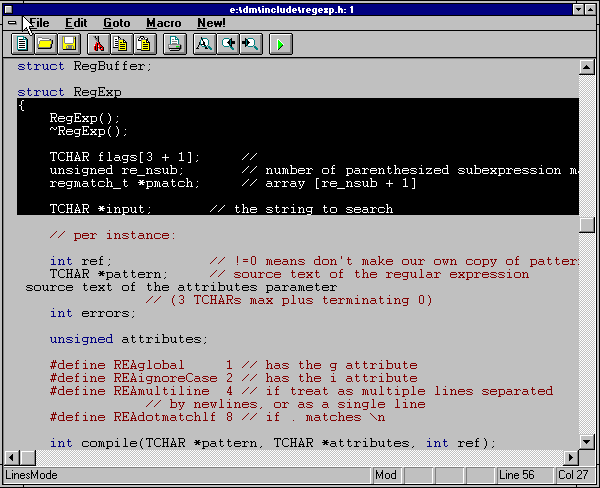
The Source Window
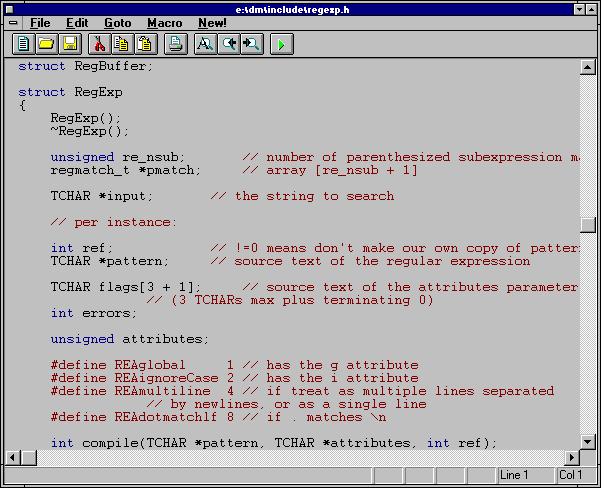
[Figure 6-1 Source window]
Most work with a Source window is in the editing area. This is where text is displayed and edited, as described later in this chapter. The Source window contains a typical IDDE window menu and toolbar; a pop-up menu is available by right-clicking in the editing area. Complete information about the menus and toolbar is contained in Chapter 21, Text Editor Reference.
The status bar, shown in Figure 6-2, provides information about the current state of the file being edited.
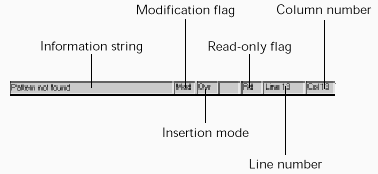
[Figure 6-2 Source window status bar]
- Information string
- Displays information about the state of the current function. For example, the message Pattern not found is displayed when the Find command is unable to locate the specified pattern.
- Modification flag
- Displays Mod if the file has been modified since it was last saved.
- Insertion mode
- Displays Ovr when the typing mode is set to overtype. When the typing mode is set to insert, nothing is displayed in this field. Toggle the insertion mode with the Insert key.
- Read-only flag
- Displays Rd when the file is set to read-only. When the file is in read/ write mode, nothing is displayed in this field. The read-only attribute is set in the Current Buffer Options dialog box described later in this chapter.
- Line number
- Displays the line number of the insertion point.
- Column number
- Displays the column position of the insertion point.
File Manipulation
The IDDE lets you open as many different files as your computer's memory allows. You can open multiple views of one file; changes made in one window will be made in all.Creating files
To create a new file, choose New from the IDDE's File menu. An empty Source window opens, and you can begin typing. Note that the new file is not actually created on disk until you save it.Opening files
To open a source file (or any text file), choose Open from the IDDE's File menu, or choose Open from a Source window's File menu. A standard Windows File Open dialog box is displayed. Select the file you want to edit and click OK. The file is opened for editing in a new Source window. There are additional ways to open a file for editing:- Choose a file from the list of recently opened files at the bottom of the IDDE's or Source window's File menu.
- Double-click on a filename in the Project window.
- Click New! in a Source window to open another view of the same file.
- Choose Load from the Source window's File menu. The file you select opens in the same Source window, replacing the previous file.
Saving files
To save the file in the active window, choose Save from the Source window's File menu. If the file is untitled, the editor displays the File Save As dialog box to let you name it. Otherwise, it saves the file under its current name. This procedure saves only the file in the active Source window.To save the files in all Source windows, choose Save All from the Source window's File menu. The editor displays the Save As dialog box for any untitled file.
To save an unnamed file or a named file under a new name, choose Save As from the File menu. The text editor displays the File Save As dialog box, as shown in Figure 6-3.
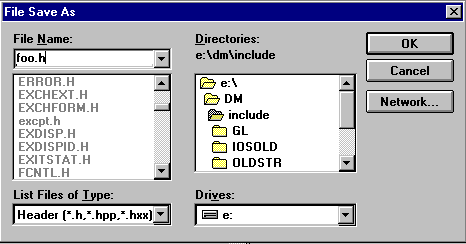
[Figure 6-3 File Save As dialog box]
Enter a name for the file and click OK.
Writing blocks of text to files
By choosing Write Block from the Source window's pop-up menu, you can write the currently selected text block to a new file or append the block to an existing file. This is useful when, for example, you want to remove some functions from a file and place them in a separate file.Printing files
To print the file in the active window, choose Print from the Source window's File menu. The Text Print dialog box opens, as shown in Figure 6-4.
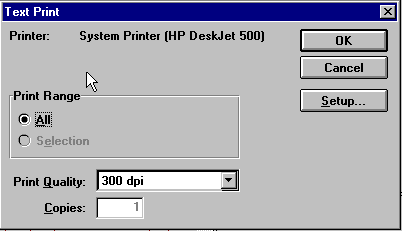
[Figure 6-4 Text Print dialog box]
The contents of the Text Print dialog box depend on the default printer you specify in the Windows control panel. Make any necessary changes in the dialog box, then click OK to print.
Closing files
To close a file in a Source window, choose Close from the Source window's File menu, or click the close button. If you've edited the file since the last time it was saved, the IDDE displays a dialog box asking if you would like to save the file.Text Editing
This section describes the text editing features available in the Source window.Typing mode
Source windows support two typing modes: overtype, which replaces characters as you type; and insert, which adds new characters to the file. You can toggle the typing mode between overtype and insert modes by using the Insert key. (Press Alt+I if you selected the Brief key binding set.) The typing mode is displayed in the status bar. A change in typing mode applies to all open Source windows, not just to the active window.Word wrap
Because the editor is designed for source files, word wrap is not enabled by default. You must press the Enter key to start a new line. When you type past the right edge of the window, the text scrolls horizontally. You can enable word wrap and set a right margin either locally or globally using the text editor options.Indentation
By default, the editor automatically indents a new line to the same depth as the previous line. You can set several indentation options, such as autoindent, tab width, and indent/ unindent after braces.It also is possible to change the indentation of a selected block of text by choosing Indent Block or Unindent Block from the Format Text submenu of the Source window's pop-up menu.
Moving around in a file
You can move the insertion point in a file by using the mouse or keyboard in the standard Windows text-editing manner. In addition, you can jump to specific points in a file using commands from the Source window's Goto menu.Jumping to a matching delimiter
A common source of problems in C and C++ programming is parentheses (()), brackets ([]), and braces ({}) that don't match. To find the other half of a pair of these delimiters, position the insertion point in front of one of the delimiters and choose Matching Delimiter from the Goto menu. The insertion point then moves to the front of the other half of the pair.Delimiter checking can also be done automatically using the text editor options described later in this chapter.
Note: The IDDE editor looks for any parenthesis, bracket, or brace, including text in strings and comments.
Jumping to a specific line
To jump to a specific line, choose Line from the Goto menu. The Goto Line dialog box, shown in Figure 6-5, opens.
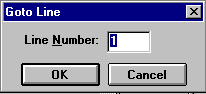
[Figure 6-5 Goto Line dialog box]
Type the line number in the textbox and click OK. The editor moves the insertion point to the beginning of the specified line.
Jumping to a function
To jump to a specific function, choose Function from the Goto menu. The Goto Function dialog box, shown in Figure 6-6, opens.
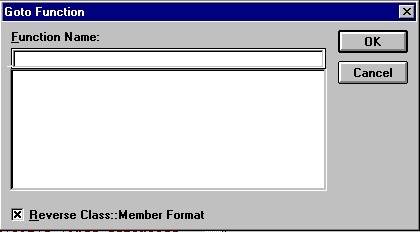
[Figure 6-6 Goto Function dialog box]
You can select a function name from the scrolling list or type in a function name. The insertion point then moves to the beginning of the specified function.
Jumping to a bookmark
The IDDE text editor lets you position bookmarks anywhere in your files by choosing Bookmark from the Source window's Goto menu. The Bookmarks dialog box, shown in Figure 6-7, opens.
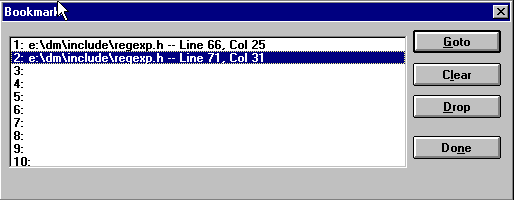
[Figure 6-7 Bookmarks dialog box]
To use bookmarks, first position the insertion point where you want the bookmark to be located. Then choose Bookmark from the Goto menu, select a bookmark, and click on the Drop button. When you want to return to this location, click on this entry's name in the list of bookmarks, then click on Goto.
Selecting text
Text selection is accomplished using one of two standard techniques: clicking and dragging the mouse or shift-clicking. The IDDE text editor provides additional modes for text selection using the Column and Line commands in the pop-up menu's Select submenu.Both commands require that you first select a block of text in the standard manner. Column changes the currently selected text block into a column-oriented select block; only the characters in the columns between the start and end of the original text block are selected. This is shown in Figure 6-8.
[Figure 6-8 A column select block]
Line changes the currently selected text block into a line-oriented select block; all the lines from the start to the end of the original text block, including the first and last lines, are selected.
This is shown in Figure 6-9.
[Figure 6-9 A line select block]
Choosing Normal from the Select submenu of the pop-up menu changes a column-or line-oriented text block back to the original selection. Cancel deselects the current selection block; this can also be accomplished by clicking somewhere outside the selected text.
The text editor supplies standard Windows functions for cutting, copying, pasting, and deleting text. These functions can be accessed through either the Edit menu or the pop-up menu. In addition, by clicking and dragging a block of selected text, you can reposition the text anywhere in the buffer. Press the Control key while releasing the block to copy rather than move the block. When you are dragging text blocks around in this way, a small outlined box is drawn next to the cursor to indicate this mode.
Searching and replacing
The IDDE editor has powerful text-based search and replace functions that let you search open files for a string and replace one string with another. In addition, you can search through any set of source files, whether or not they are open or in your project.Finding a string
To search for a string, choose Find from the Source window's Edit menu. The dialog box shown in Figure 6-10 opens.
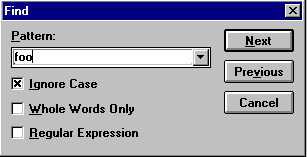
[Figure 6-10 Find dialog box]
If you select some text before opening the Find dialog box, the selected text becomes the default search pattern. You can either use this text as it appears, select a previous string from the drop-down list, or type in a new string. Then click on the Next (or Previous) button. The editor locates and selects the next (or previous) occurrence of the string in the active file. You can repeat the search in the same direction by choosing Repeat Find from the Edit menu. If the pattern is not found, the editor returns to the current insertion point and displays Pattern not found in the status line.
By checking Regular Expression in the Find dialog box, you can use the wildcard characters ? and * in your search string. The ? character matches any single character, while the * character matches any string of consecutive characters. Regular expressions permit more powerful text searches.
Replacing a string
To replace an occurrence of a string in your file with another string, choose Replace from the Source window's Edit menu. The Replace dialog box opens, as shown in Figure 6-11.
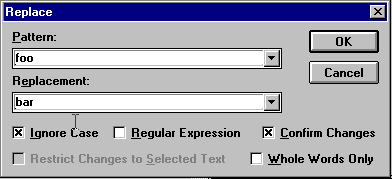
[Figure 6-11 Replace dialog box]
Type the search string or regular expression in the Pattern textbox, just as you did in the Find dialog box described earlier. Then type the replacement string in the Replacement textbox. Note that wildcards cannot be used in the Replacement textbox. You can also select previous search and replacement strings from the drop-down list. Begin the replacement by clicking OK.
If you check the Confirm Changes option, the editor scrolls the display to each occurrence of the search string, selects it, and asks whether you want to replace it by displaying the Confirm Replacement dialog box in Figure 6-12.
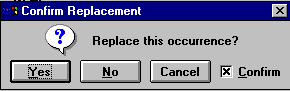
[Figure 6-12 Confirm Replacement dialog box]
Click on Yes to replace the string and continue searching, or click on No to continue searching without replacing. Click on Cancel to stop searching. If you do not check Confirm Changes, the editor replaces all occurrences of the search string without confirmation messages.
You can use the Undo command to undo the entire set of replacements of the search string.
Searching through multiple files
The text editor's global find feature provides a powerful means of locating a string in any set of files. For example, this feature is useful for:- Locating undefined symbols
- Changing function, variable, or class names
- Fixing references to a function with changed parameters
The Global Find dialog box opens, as shown in Figure 6-13.
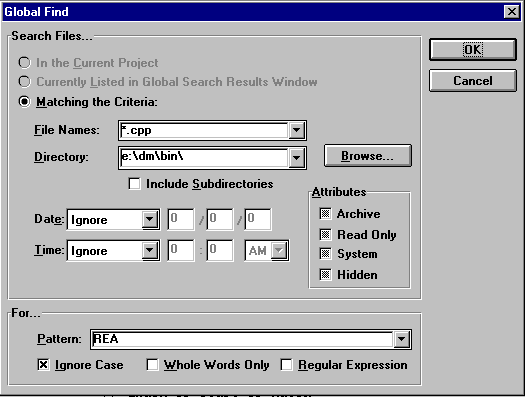
[Figure 6-13 Global Find dialog box]
To perform a global search, first specify the set of source files you want to search. You can choose to search:
- All source files in the current project
- All files listed in the Search window (which opens after the first search)
- All files matching the criteria you specify, including filename, directory, date, time, and file attributes
By double-clicking on a filename, you can open the file; the first occurrence of the pattern is highlighted. You can continue searching for your string or expression in that file by choosing Repeat Find from the Source window's Edit menu. For more information, see Chapter 21, Text Editor Reference.
Undoing edits
You can undo typing, cutting, pasting, and string-replace operations by choosing Undo from the Edit menu. Undo multiple edits by repeatedly selecting the Undo command. You can set the number of editing operations that can be undone in the text editor options.Text Editor Options
Global text editor options are set in the Editing/Browsing Settings dialog box, shown in Figure 6-14. To open this dialog box, choose Text Settings from the Edit menu. (You can also choose Editing/Browsing Settings from the Environment menu; in this case you will have access to Class and Hierarchy Editor options as well.)

[Figure 6-14 Editing/ Browsing Settings dialog box]
The Editing/Browsing Settings dialog box is a tabbed dialog that contains numerous options for different aspects of the text editor:
- The Text page contains options for indentation, cursor styles, keyboard emulation, and text editor font.
- The C++ page lets you set options to enable C++ mode globally, check delimiters, indent after braces, auto-align comments, and add keywords to the keyword dictionary.
- The Keys page lets you customize key bindings and assign key combinations to macros.
- The Display page lets you select special colors and font styles for keywords, comments, and preprocessor symbols.
- The Backup page lets you set options for backing up files.
- The General page lets you set the maximum undo level and select a key binding file.
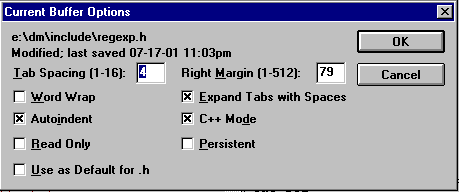
[Figure 6-15 Current Buffer Options dialog box]
This dialog lets you override global indentation options, set word wrap, and set the buffer to read-only.
You can find detailed information about text editor options in Chapter 21, Text Editor Reference.
Macros
The text editor has powerful macro facilities. You can record a sequence of keystrokes, save the sequence as a named macro, assign a keyboard shortcut to the macro, place the macro in the Macro menu, edit the macro, and so on. To record a macro, choose Record Macro from the Macro menu; to end the macro, choose Stop Recording. You can play back the stored sequence by choosing Play Macro.Compiling Files and Checking Errors
The IDDE makes it easy to iteratively edit and check your source code. To save and compile the current buffer, choose Compile from the Source window's File menu. The IDDE compiles the file using the current project build settings. If the compilation is successful, the file is marked as compiled. If the compilation generated errors, you can quickly locate the line in your source code that generated the error by double-clicking on the error in the Output window.For more information about compiling files and building the project, see Chapter 8, Testing an Application.