


12. Lesson 3: Customize the Interface
After an application framework has been generated with AppExpress, it is usually necessary to customize the user interface. This typically is an ongoing process; as your application evolves, you can add and remove interface elements. In this lesson you perform the initial stage of customization. You will:- Use ResourceStudio to customize TMLRead's menu and toolbar
- Edit the code that sets up the toolbar
Before starting this lesson, start the IDDE and open the project tmlread.prj found in directory samples\tutorial\lesson3\start.
Launching ResourceStudio
An application's resources are contained in a resource script file, which includes descriptions of menus, dialog boxes, and other user interface elements. The resource script file is edited with ResourceStudio. To launch ResourceStudio:- Open the Project window by pressing Ctrl+Shift+P.
- In the Project window, double-click on tmlread.rc.
- When asked if you want to use ResourceStudio to edit this file, click Yes. ResourceStudio starts, with its Shell window minimized. (The Shell window is a control center from which you can create and open resource files. You will use it later in this lesson.)
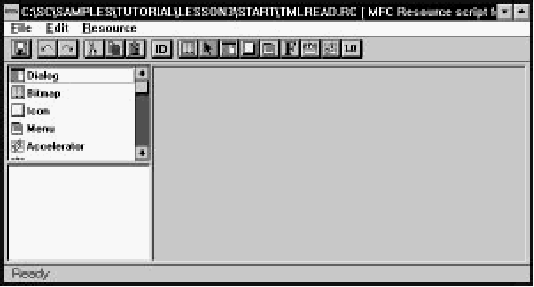
[Figure 12-1 The Browser window of ResourceStudio]
The TML Reader is only able to read and display TML files; it cannot edit or write them. Thus, you can remove menu items related to editing and saving.
Customizing the Menu
In this section you customize TMLRead's menu.Within ResourceStudio are several individual editors, each capable of editing a single type of resource. For example, the Dialog editor is used to edit dialog box resources, and the Menu editor to edit menu resources. By default, the editors use the right pane of the Browser window.
To start the Menu editor:
- Click on Menu in the Browser window's upper-left pane.
- Double-click on IDR_MAINFRAME in the lower-left pane.
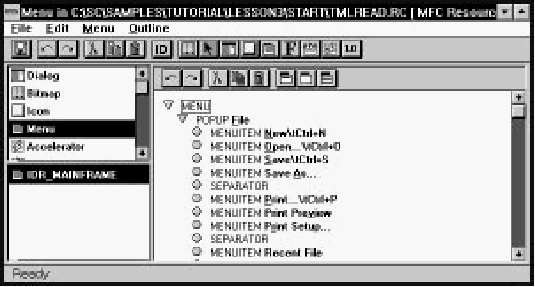
[Figure 12-2 The Menu editor in the Browser window]
As the Menu editor opens, the Property Sheet also opens (Figure 12-2). This window is used to edit resource and resource element properties and options.
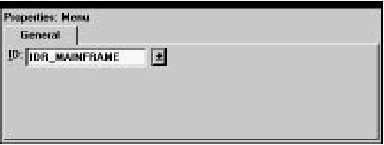
[Figure 12-3 The Property Sheet]
The Test Menu pop-up window also opens simultaneously with the Menu editor (Figure 12-2). It is a top-level window whose menu is identical to the one you are editing. This window does nothing when you choose menu items that are not top-level menu items or submenus.
Because changes you make to the menu in the Browser window are immediately reflected in the menu of the Test Menu window, you can verify your changes as you make them.
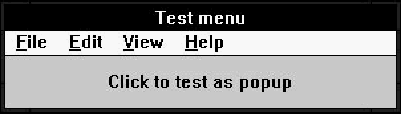
[Figure 12-4 The Test Menu window]
Now you can remove unnecessary menus and menu items.
- Click on "MENUITEM New" to select this menu item.
- Press Delete.
- Repeat the above steps to delete:
- "MENUITEM Save"
- "MENUITEM Save As"
- "POPUP Edit"
- "MENUITEM Index"
- "MENUITEM Using Help" and the following "SEPARATOR"
To close the Menu editor, choose Close Editing from the File menu, or press Escape. The Browser window menu and toolbar return. The right pane shows a preview of the menu.
Although we have removed menu items for commands that will not be supported, at present it would still be possible to access some of those commands through their accelerators. In the next section we remove those commands from the accelerator table.
Customizing the Accelerator Table
To start the Accelerator Table editor:- Click on Accelerator in the Browser window's upper-left pane.
- Double-click on IDR_MAINFRAME in the lower-left pane.
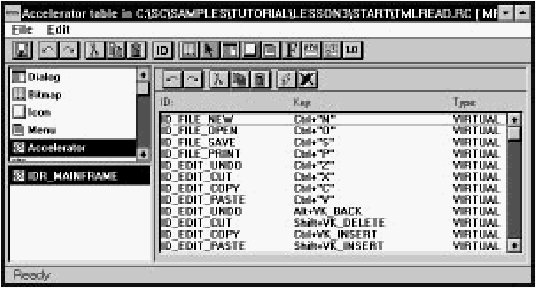
[Figure 12-5 The Accelerator Table editor in the Browser window]
Removing accelerators is quite similar to removing menu items. To remove the unnecessary accelerators:
- Click on ID_FILE_NEW.
- Press Delete.
- Repeat the above steps for all the accelerators, leaving only ID_FILE_OPEN and ID_FILE_PRINT.
To close the Accelerator Table editor, press Escape.
Commands may be sent to TMLRead in one other way: by clicking on buttons in the toolbar. In the next section we replace the toolbar bitmap with one containing only commands that are supported by TMLRead.
Importing a New Toolbar Bitmap
Before importing a new toolbar bitmap, delete the current toolbar bitmap:- Click on Bitmap in the Browser window's upper-left pane.
- Click on IDR_MAINFRAME in the lower left-pane.
- Press Shift+ Delete.
- Double-click the ResourceStudio icon to restore the Shell window.
- In the Shell window, choose Open from the File menu.
- Select the file newbar.rc and click OK.
- In the upper-left pane of the new Browser window, click on Bitmap.
- In the lower-left pane, click on IDB_NEWBAR. A
preview of the bitmap appears in the right pane
(Figure 12-6).

[Figure 12-6 New toolbar bitmap]
- Choose Copy from the Edit menu. The bitmap is copied to the clipboard.
- Choose Close from the File menu. The second Browser window closes. Activate the Browser window containing tmlread.rc by clicking on it.
- Choose Paste from the Edit menu. The bitmap is added to your application's resources.
- Click on the Property Sheet to bring it to the front. The Property Sheet shows the resource ID and memory options for the bitmap resource.
- From the ID drop-down list, select IDR_MAINFRAME.
Exiting ResourceStudio
To save your work and exit Resource Studio:- Choose Save from the Browser window's File menu.
- Choose Close from the File menu. The Browser window closes, but the Shell window and Property Sheet remain open.
- Choose Exit from the Shell window's File menu.
Setting Up the New Toolbar
The MFC framework uses a single bitmap to represent a set of toolbar buttons. The correspondence between the button images in the bitmap and the commands they represent is established in an array in the source code. Because you have replaced the original toolbar bitmap, you also must update this array.- In the Project window, double-click on mainfrm.cpp. A Source window opens, displaying the frame window class's source code.
- Scroll downward a few lines until you find the following
code:
// toolbar buttons -IDs are command buttons static UINT BASED_CODE buttons[] = { // same order as in the bitmap 'toolbar. bmp' ID_FILE_NEW, ID_FILE_OPEN, ID_FILE_SAVE, ID_SEPARATOR, ID_EDIT_CUT, ID_EDIT_COPY, ID_EDIT_PASTE, ID_SEPARATOR, ID_FILE_PRINT, ID_APP_ABOUT, ID_CONTEXT_HELP, }; - Remove and rearrange lines until the array looks like
this:
// toolbar buttons -IDs are command buttons static UINT BASED_CODE buttons[] = { // same order as in the new toolbar bitmap ID_FILE_OPEN, ID_SEPARATOR, ID_FILE_PRINT, ID_SEPARATOR, ID_APP_ABOUT, }; - Save the code by choosing Save from the Source window's File menu.
In the last section you build the application and view the results of your labor.
Building and Running the Application
To build and run the application, choose Execute Program from the IDDE Project menu. Because no executable has yet been built, the IDDE automatically builds TMLRead and then runs it. (When you try to run an existing executable that needs to be rebuilt, the IDDE asks if you want to rebuild the program before running it.)The source files are recompiled, the resource script is compiled by the resource compiler, and all the object files and resources are linked together to create the final application. Then the IDDE minimizes itself and executes the application (Figure 12-7).
You can verify that the changes you made to the menu and toolbar are correct. To close the application, choose Exit from the File menu.
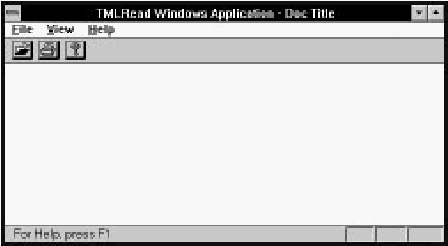
[Figure 12-7 TMLRead with customized menu and toolbar]
You now have completed initial customization of TMLRead's resources. You deleted excess menu items and accelerators and installed a new toolbar bitmap. More changes to the application's resources can be made as the need arises; in Lesson 5, for example, you will return to ResourceStudio to add support for a Preferences dialog box. In the next lesson, though, you will use ClassExpress to install functions to handle Windows messages, such as those generated by key presses and button clicks.