


25. ResourceStudio Resource Editor
This ResourceStudio reference chapter contains details about the commands and options found in the Shell and Browser windows. For an introduction to ResourceStudio, see Chapter 7, Adding Look and Feel with Resources.The Shell Window
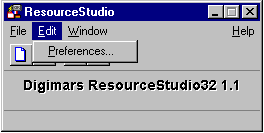
The ResourceStudio Shell window is:
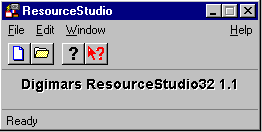
Figure 25-1 The Shell window
The Shell window is ResourceStudio's main control center. It opens resource files, creates new resource files, sets preferences, arranges windows, and accesses online help.
File menu commands
The File menu (see Figure 25-2) contains commands to create and open resource files and to exit ResourceStudio. In addition to the commands listed below, the File menu contains a list of recently opened resource files.Any of these files may be reopened by choosing its name from the menu.
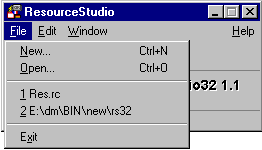
[Figure 25-2 Shell window File menu
- New
- Opens the New File dialog box (see Figure 25-3). Use this dialog
box to create a new resource file.
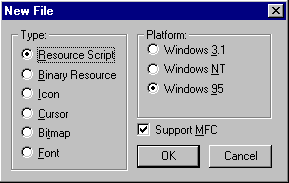
[Figure 25-3 New File dialog box
- Type
- Specifies the type of resource file to create.
For Resource Script or Binary Resource, the new file opens in a Browser window; otherwise, the appropriate resource editor opens in a separate window.Resource script Creates a resource script (.rc) file Binary resource Creates a binary resource (.res) file Icon Creates an icon (.ico) file Cursor Creates a cursor (.cur) file Bitmap Creates a bitmap (.bmp) file Font Creates a font (.fnt) file - Platform
- Specifies the target platform for the resource file.
Windows 95 resources use the MENUEX and DIALOGEX resource types for menus and dialogs, respectively. For more information, see your Windows 95 documentation.Windows 3.1 Creates resources for Windows 3.1 Windows NT Creates resources for Windows NT Windows 95 Creates resources for Windows 95 - Support MFC
- Applies to resource script files; specifies that the file should include MFC resource headers. Check this box if you plan to use your resources in an MFC application.
- Open
- Opens the File Open dialog box (see Figure 25-4). This is a standard
dialog box for opening files, with an extra field for specifying the
target platform.
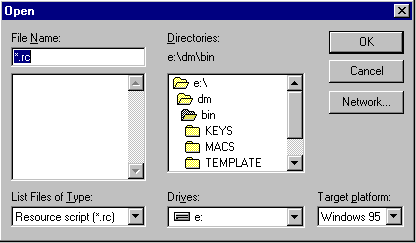
[Figure 25-4 File Open dialog box
- Target platform
- Specifies the target platform. Choices include Windows 3.1, Windows NT, and Windows 95.
- Exit
- Closes ResourceStudio.
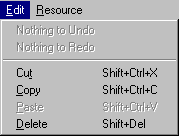
Edit menu commands
The Edit menu (see Figure 25-5) contains a single command, used to set ResourceStudio preferences.
[Figure 25-5 Shell window Edit menu
Preferences
Opens the Preferences dialog box, used to set miscellaneous ResourceStudio options. This dialog box has three tabs of options.Note: The Controls tab of options is not available when running ResourceStudio on Windows 95 and Windows NT.
The General tab (see Figure 25-6) contains miscellaneous ResourceStudio options.
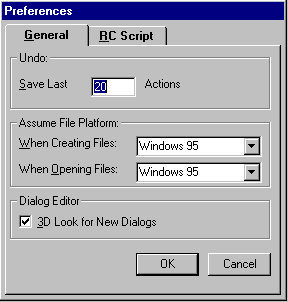
[Figure 25-6 General tab of Preferences dialog box
- Undo
- Specifies the number of previous states that are saved and, therefore, the number of actions that can be undone. Each Browser window and each individual resource editor keeps a separate list of actions that were undone.
- Assume File Platform
- These options specify default file platforms for creating and loading
resource files.
- When Creating Files:
- Specifies default platform for new resource files.
- When Opening Files:
- Specifies default platform for opened resource files.
- 3D Look for New Dialogs
- If checked, new dialogs are given a 3-dimensional look by default.
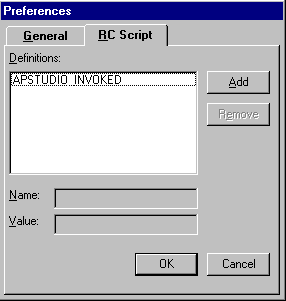
[Figure 25-7 RC Script tab of Preferences dialog box
- Definitions
- Contains a list of symbols to be defined with a #define directive in each .rc file. Click on a symbol to copy its name and value to the textboxes below the list. You can edit the name or value, then click on the symbol in the list again to copy the new name and value back to the list.
- Name
- Contains a symbol name.
- Value
- Contains a symbol value.
- Add
- Adds the current symbol and value to the Definitions list.
- Remove
- Deletes the currently selected symbol from the Definitions list.
Note: The Controls tab of options is not available when running ResourceStudio on Windows 95 and Windows NT.
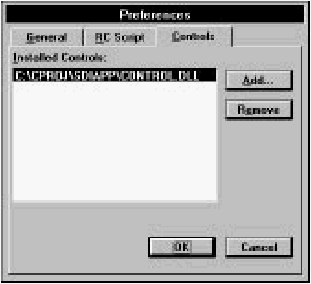
[Figure 25-8 Controls tab of Preferences dialog box
- Installed Controls
- Contains a list of custom control DLLs that are currently installed.
- Add
- Adds a custom control DLL to the list of installed controls.
- Remove
- Removes a custom control DLL from the list of installed controls.
Window menu commands
The Window menu (see Figure 25-8) contains commands to arrange ResourceStudio windows. These commands execute the standard Windows Cascade, Tile, and Close All functions. Attached to the bottom of the menu is a list of currently opened Browser and editor windows. Choose a window name to bring that window to the foreground or to restore it after it has been minimized.
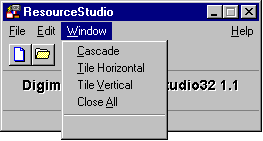
[Figure 25-9 Shell window Window menu
Help menu commands
The Help menu (see Figure 25-9) contains commands to access online help and to display program information.
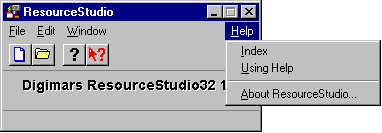
[Figure 25-10 Shell window Help menu
- Index
- Opens ResourceStudio online help to the index.
- Using Help
- Opens online help to information about how to use help.
- About ResourceStudio
- Opens a dialog box that displays ResourceStudio version and copyright information.
Toolbar commands
The Shell window toolbar provides quick access to menu commands and to context-sensitive help:

[Figure 25-11 Shell window toolbar]

| Creates a new resource script file and opens it in a Browser window. The platform is set to the default platform for creating new files (as set in the Preferences dialog box). |

| Same as choosing Open from the File menu, except that the target platform for the resource is automatically set to the last platform chosen with File Open. |

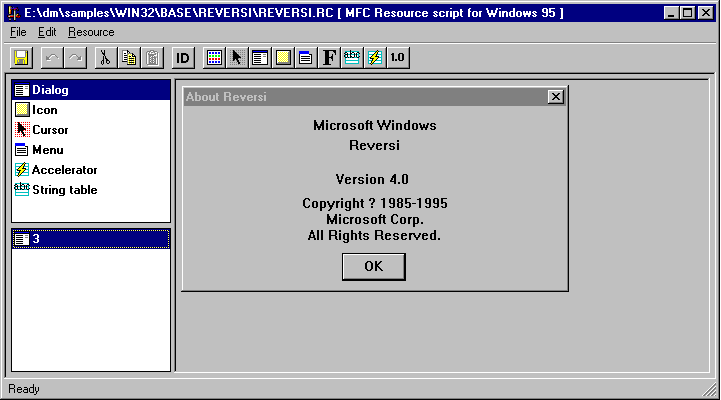
| Same as choosing About ResourceStudio from the Help menu. |

| Enters context-sensitive help mode. A question mark is appended to the cursor while in this mode. Select any component of ResourceStudio, such as a menu item or a toolbar icon, to open the online help for information about that component. |
The Browser Window
The Browser window (see Figure 25-11) supervises the editing of a multiresource file, such as a resource script file. The resource types contained in the file are listed in the upper-left pane; when a type is selected, the resources of that type are listed in the lower-left pane. The right pane contains a preview of the currently selected resource.
[Figure 25-12 The Browser window
Individual resources can be edited either in separate windows or in the right pane of the Browser window. In the latter case, the menu bar of the resource editor replaces the Browser window's menu bar during editing.
File menu commands
The File menu (see Figure 25-12) contains commands to save the resource file, to edit resources, and to perform other miscellaneous functions.

[Figure 25-13 Browser window File menu
- Save
- Saves the resource file. If the file is unnamed, this command executes Save As.
- Save As
- Opens a Windows File Save As dialog box, which can be used to save the resource file under a new name.
- Edit Resource
- Opens the selected resource in the right pane of the Browser window so that the resource can be edited. This command is also executed by double-clicking on a resource, or double-clicking in the right pane when a preview of the resource is displayed there.
- Edit in Separate Window
- Opens the selected resource in a separate window so that the resource can be edited.
- Export Resource
- Opens a dialog box that can be used to save the currently selected resource in a separate file. This command is only available when the current resource is a bitmap, icon, cursor, or font.
- Edit Resource IDs
- Opens the Resource ID Browser dialog box (see Figure 25-13).
This dialog box is used to browse and modify resource IDs.
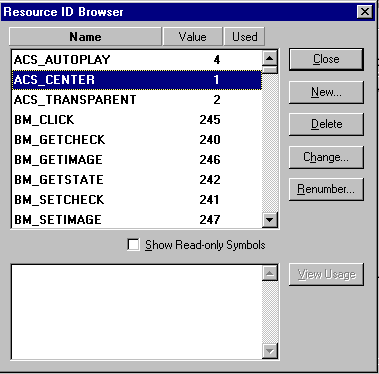
[Figure 25-14 Resource ID Browser dialog box
For more information about managing resource IDs and using the Resource ID Browser dialog box, see "Managing Resource IDs," in Chapter 7, "Adding Look and Feel with Resources."
- ClassExpress
- Runs ClassExpress and passes the filename of the resource file as the project that ClassExpress should open. You should run ClassExpress, for example, after creating a dialog box. With ClassExpress you can create a class for the dialog box, set up a message map, and add member variables corresponding to controls. For more information, see Chapter 18, "More about ClassExpress," and Chapter 14, "Lesson 5: Add a Dialog Box with ClassExpress."
- Close
- Closes the Browser window.
Edit menu commands
The Edit menu (see Figure 25-15) contains standard editing commands. You can copy and paste entire resources, making it easy to move resources from one file to another.
[Figure 25-15 Browser window Edit menu
- Undo
- Undoes the last Browser window operation.
- Redo
- Redoes the last Browser window operation that was undone.
- Cut
- Copies the selected resource to the Clipboard, then deletes it from the resource file.
- Copy
- Copies the selected resource to the Clipboard.
- Paste
- Copies the resource in the Clipboard into the resource file.
Delete - Deletes the selected resource from the resource file.
Resource menu commands
Commands in the Resource menu (see Figure 25-16) are used to create new resources. In each case, a new ID is automatically created and assigned to the resource, and the resource is opened in the right pane of the Browser window so that the resource can be edited.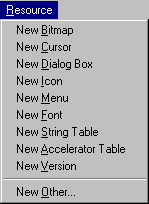
[Figure 25-16 Browser window Resource menu
- New Dialog Box
- Creates a new dialog box. As the resource is created, the DialogExpress dialog box lets you select a predefined dialog type to use as a starting point (see "Dialog Editor," in Chapter 26, "Dialog Editor").
- New Bitmap
- Creates a new bitmap. As the resource is created, the BitmapExpress dialog box lets you specify initial bitmap parameters (see "Bitmap Editor," in Chapter 28, "Bitmap, Cursor, Icon, and Font Editors").
- New Icon
- Creates a new icon.
- New Cursor
- Creates a new cursor.
- New Menu
- Creates a new menu.
- New Font
- Creates a new font. As the resource is created, the FontExpress dialog box lets you specify initial font parameters (see "Font Editor," in Chapter 28, "Bitmap, Cursor, Icon, and Font Editors").
- New String Table
- Creates a new string table.
- New Accelerator Table
- Creates a new accelerator table.
- New Version
- Creates a new version information resource.
- New Other
- Opens the Create Custom Resource dialog box (see Figure 25-17). Use this
dialog box to select a custom resource type to create and to define
new custom resource types.
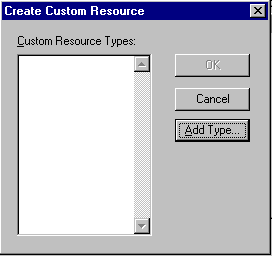
[Figure 25-17 Create Custom Resource dialog box
To create one of the listed resource types, select it and click OK. To define a new resource type, click on Add Type. The New Resource Type dialog box opens (see Figure 25-18).
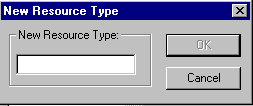
[Figure 25-18 New Resource Type dialog box
Type a name for the new resource type in the textbox and click OK. The new type is added to the list in the Create Custom Resource dialog box.
Toolbar commands
The Browser window toolbar provides quick access to frequently used menu commands:
[Figure 25-19 Browser window toolbar]

Same as choosing Save from the File menu. 
Same as choosing Undo from the Edit menu. Right-click on this button to undo multiple operations at once. 
Same as choosing Redo from the Edit menu. Right-click on this button to redo multiple operations at once. 
Same as choosing Cut from the Edit menu. 
Same as choosing Copy from the Edit menu. 
Same as choosing Paste from the Edit menu. 
Same as choosing Edit Resource IDs from the File menu. 
Same as choosing New Bitmap from the Resource menu. 
Same as choosing New Cursor from the Resource menu. 
Same as choosing New Dialog Box from the Resource menu. 
Same as choosing New Icon from the Resource menu. 
Same as choosing New Menu from the Resource menu. 
Same as choosing New Font from the Resource menu. 
Same as choosing New String Table from the Resource menu. 
Same as choosing New Accelerator Table from the Resource menu. 
Same as choosing New Version from the Resource menu. Resource properties
When the Browser window is active and a resource in the lower-left pane is selected, the Property Sheet displays properties of the resource, which specify the resource ID and the resource memory options. Figure 25-20 shows the properties of a Menu resource.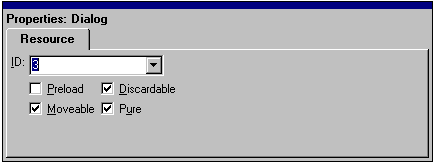
[Figure 25-20 Resource properties
ID Specifies the resource ID by one of the following: - Select an existing ID from the drop-down list.
- Type a new symbol for the resource ID. The ID is assigned a new, unique value.
- Type a new symbol, followed by an equal sign, followed by a value (for example, IDC_NAME=550). If you do not specify a value, one is supplied. The ID is assigned the value.
- Type a textual resource identifier, enclosed in double quotes (for example, "MenuOne"). Textual IDs cannot be assigned to font resources.
Preload Specifies that the resource should be loaded into memory when the application is started. If this option is not checked, the resource is loaded when it is needed. Moveable Lets Windows move the resource in memory after it is loaded. Discardable Lets Windows remove the resource from memory when it is no longer needed. Pure Protects the resource in memory from being modified. Copyright © 1999-2018 by Digital Mars ®, All Rights Reserved | Page generated by Ddoc. - Deletes the selected resource from the resource file.