


27. Menu, Accelerator and String Table Editors
This ResourceStudio reference chapter contains details about the commands and options found in the Menu editor, the Accelerator Table editor and the String Table editor. For an introduction to ResourceStudio, see Chapter 7, "Adding Look and Feel with Resources."Menu Editor
The Menu editor (see Figure 27-1) is used to edit menu resources.
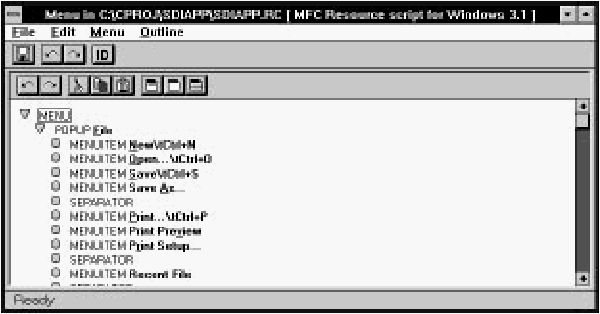
[Figure 27-1 The Menu editor
The Menu editor displays the menu as a hierarchy of POPUPs, each of which may contain MENUITEMs, SEPARATORs, and other POPUPs. Items are added to the menu with commands in the Menu menu (or by clicking buttons in the toolbar), and are rearranged with commands in the Outline menu or by dragging with the mouse. The menu may be tested as a pull-down or pop-up menu at any time in the Test menu window, which is opened automatically when the Menu editor is started. For more information about using the Menu editor, see Chapter 7, "Adding Look and Feel with Resources."
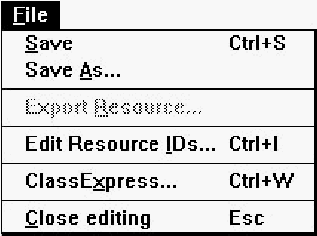
File menu commands
The File menu (see Figure 27-2) contains commands to save the resource file, to edit resource IDs, and to perform other miscellaneous functions.
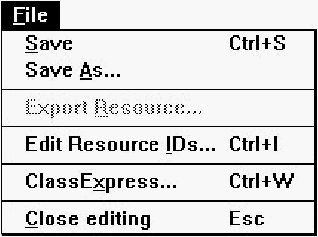
[Figure 27-2 Menu editor File menu
Save
Saves the resource file. If the file is unnamed, this command executes Save As.Save As
Opens a Windows File Save As dialog box, which can be used to save the resource file under a new name.Edit Resource IDs
Opens the Resource ID Browser dialog box, used to browse and modify resource IDs. For more information about managing resource IDs and using the Resource ID Browser dialog box, see "Managing Resource IDs," in Chapter 7, "Adding Look and Feel with Resources."ClassExpress
Runs ClassExpress, passing the filename of the resource file as the project that ClassExpress should open. This command is only enabled if the Menu editor is running in the right pane of the Browser window.Close Editing
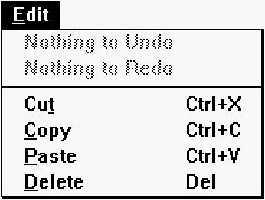
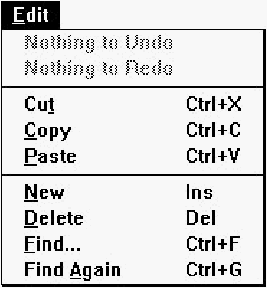
Closes the Menu editor.Edit menu commands
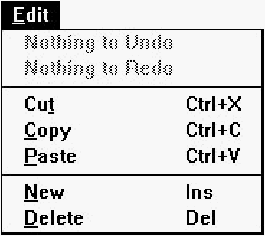
The Edit menu (see Figure 27-3) contains standard editing commands. You can undo operations, and can cut, copy, paste, and delete individual MENUITEMs or entire POPUPs.
[Figure 27-3 Menu editor Edit menu
Undo
Undoes the last Menu editor operation.Redo
Redoes the last Menu editor operation that was undone.Cut
Copies the selected item to the Clipboard, then deletes it from the menu.Copy
Copies the selected item to the Clipboard.Paste
Copies the item in the Clipboard into the menu.Delete
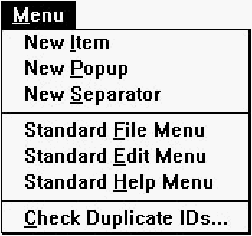
Deletes the selected item from the menu.Menu menu commands
The Menu menu (see Figure 27-4) contains commands to add items to the menu. You can insert individual MENUITEMs, POPUPs, and SEPARATORs, and you can insert predefined File, Edit, and Help menus. An additional command lets you check for duplicate command IDs.
[Figure 27-4 Menu editor Menu menu
Before adding a new item, select the item after which the new item should be inserted.
New Item
Adds a new MENUITEM after the selected item.New Popup
Adds a new POPUP after the selected item.New Separator
Adds a new SEPARATOR after the selected item.Standard File Menu
Adds a standard File menu after the selected item.Standard Edit Menu
Adds a standard Edit menu after the selected item.Standard Help Menu
Adds a standard Help menu after the selected item.Check Duplicate IDs
Checks the menu for duplicate command IDs. If any two items have the same ID, the Resolve Duplicate IDs dialog box opens (see Figure 27-5).
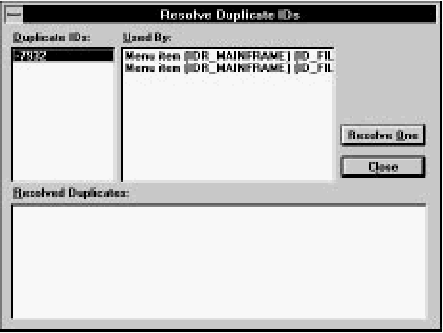
[Figure 27-5 Resolve Duplicate IDs dialog box
To resolve duplicate IDs, first click on a number in the Duplicate IDs list. The Used By listbox displays the items that are using that ID. Click on Resolve One to automatically assign new IDs (with unique values) to the items.
Outline menu commands
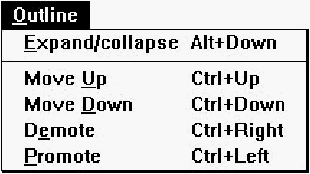
The Outline menu (see Figure 27-6) is used to rearrange the menu. You can move items within their current hierarchical level, or you can promote or demote items from one level to another.
[Figure 27-6 Menu editor Outline menu
Expand/Collapse
Expands or collapses (depending on the present state) the view of the contents of a POPUP item. While a POPUP is collapsed, the items within a POPUP are not shown, and the triangle to the left of the POPUP points rightward. While expanded, the items within the POPUP are shown and the triangle points downward. You can also execute this command by clicking on the triangle next to the POPUP.Move Up
Exchanges the selected item with the previous item in the same level of the hierarchy.Move Down
Exchanges the selected item with the next item in the same level of the hierarchy.Demote
If the previous item in the same level of the hierarchy is a POPUP, moves the selected item into the POPUP.Promote
If the selected item is within a POPUP, moves the item out of the POPUP to the same hierarchical level as the POPUP.Toolbar commands
The Menu editor toolbar (see Figure 27-7) provides quick access to frequently used menu commands.

[Figure 27-7 Menu editor toolbar
- Undo:
- Same as choosing Undo from the Edit menu. Right-click on this button to undo multiple operations at once.
- Redo:
- Same as choosing Redo from the Edit menu. Right-click on this button to redo multiple operations at once.
- Cut:
- Same as choosing Cut from the Edit menu.
- Copy:
- Same as choosing Copy from the Edit menu.
- Paste:
- Same as choosing Paste from the Edit menu.
- New Item:
- Same as choosing New Item from the Menu menu.
- New Popup:
- Same as choosing New Popup from the Menu menu.
- New Separator:
- Same as choosing New Separator from the Menu menu.
Popup item properties
POPUP item properties are shown in Figure 27-8.
[Figure 27-8 Popup properties
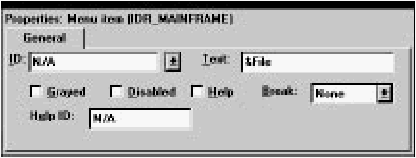
Menu item properties
MENUITEMs and SEPARATORs have two pages of properties. The General properties are shown in Figure 27-9.
[Figure 27-9 Menu item / separator General properties
A SEPARATOR would have the Separator box checked.
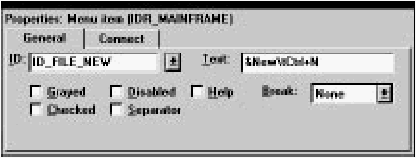
The Connect properties (see Figure 27-10) only apply to MENUITEMs.
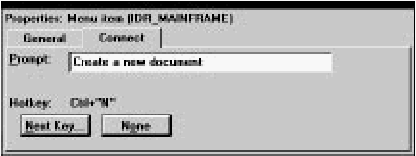
[Figure 27-10 Menu item Connect properties
The Prompt textbox is used to set help text for the item. The Hotkey field displays the accelerator key combination associated with the item. For more information about how to create menus with help text and accelerators, see Chapter 7, "Adding Look and Feel with Resources."
Accelerator Table Editor
The Accelerator Table editor (see Figure 27-11) is used to edit accelerator tables.
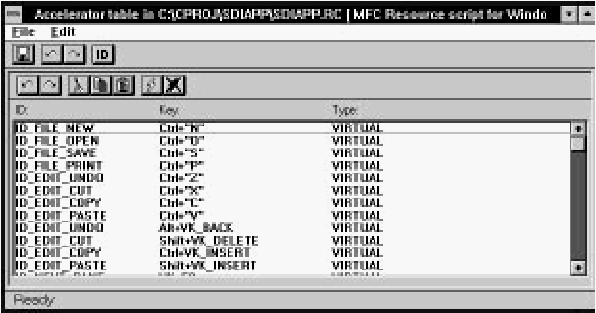
[Figure 27-11 The Accelerator Table editor
The Accelerator Table editor displays a list of accelerator IDs and associated key combinations. To create and delete accelerators, use the New and Delete commands in the Edit menu. You can set the ID and key combination of an accelerator in the Property Sheet.
Accelerators are usually associated with menu items, and you can create accelerators directly from the Menu editor. For more information, see Chapter 7, "Adding Look and Feel with Resources."
File menu commands
The File menu (see Figure 27-12) contains commands to save the resource file, to edit resource IDs, and to perform other miscellaneous functions.
[Figure 27-12 Accelerator Table editor File menu
Save
Saves the resource file. If the file is unnamed, this command executes Save As.Save As
Opens a Windows File Save As dialog box, which can be used to save the resource file under a new name.Edit Resource IDs
Opens the Resource ID Browser dialog box, used to browse and modify resource IDs. For more information about managing resource IDs and using the Resource ID Browser dialog box, see "Managing Resource IDs," in Chapter 7, "Adding Look and Feel with Resources."ClassExpress
Runs ClassExpress, passing the filename of the resource file as the project that ClassExpress should open. This command is only enabled if the Accelerator Table editor is running in the right pane of the Browser window.Close Editing
Closes the Accelerator Table editor.Edit menu commands
The Edit menu (see Figure 27-13) contains standard editing commands. You can undo operations, and can cut, copy, paste, add, and delete accelerators.
[Figure 27-13 Accelerator Table editor Edit menu
Undo
Undoes the last Accelerator Table editor operation.Redo
Redoes the last Accelerator Table editor operation that was undone.Cut
Copies the selected accelerator to the Clipboard, then deletes it from the table.Copy
Copies the selected accelerator to the Clipboard.Paste
Copies the accelerator in the Clipboard into the table.New
Adds a new accelerator to the table.Delete
Deletes the selected accelerator from the table.Toolbar commands
The Accelerator Table editor toolbar (see Figure 27-14) provides quick access to frequently used menu commands.

[Figure 27-14 Accelerator Table editor toolbar
- Undo:
- Same as choosing Undo from the Edit menu. Right-click on this button to undo multiple operations at once.
- Redo:
- Same as choosing Redo from the Edit menu. Right-click on this button to redo multiple operations at once.
- Cut:
- Same as choosing Cut from the Edit menu.
- Copy:
- Same as choosing Copy from the Edit menu.
- Paste:
- Same as choosing Paste from the Edit menu.
- New:
- Same as choosing New from the Edit menu.
- Delete:
- Same as choosing Delete from the Edit menu.
Accelerator properties
Accelerator properties are shown in Figure 27-15.
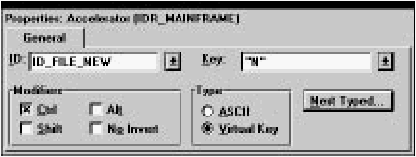
[Figure 27-15 Accelerator properties
The accelerator key combination can be set by clicking on Next Typed, then pressing the key combination. The Key, Type, and Modifiers options are set automatically.
String Table Editor
The String Table editor (see Figure 27-16) is used to edit string tables.
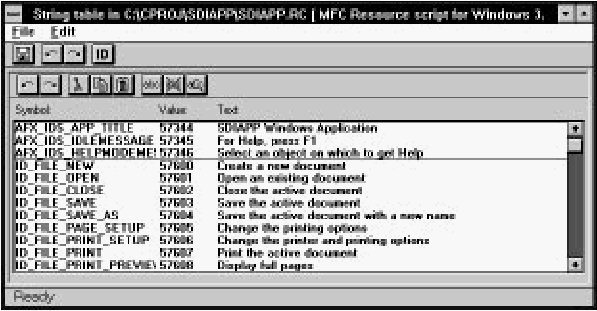
[Figure 27-16 The String Table editor
The String Table editor displays a list of IDs and associated text. To create and delete strings, use the New and Delete commands in the Edit menu. You can set the ID and text of a string in the Property Sheet.
Although they can be used for any purpose, strings are commonly used to display information about menu commands. You can create strings associated with menu items directly from the Menu editor. For more information, see Chapter 7, "Adding Look and Feel with Resources."
File menu commands
The File menu (see Figure 27-17) contains commands to save the resource file, to edit resource IDs, and to perform other miscellaneous functions.

[Figure 27-17 String Table editor File menu
Save
Saves the resource file. If the file is unnamed, this command executes Save As.Save As
Opens a Windows File Save As dialog box, which can be used to save the resource file under a new name.Edit Resource IDs
Opens the Resource ID Browser dialog box, used to browse and modify resource IDs. For more information about managing resource IDs and using the Resource ID Browser dialog box, see "Managing Resource IDs," in Chapter 7, "Adding Look and Feel with Resources."ClassExpress
Runs ClassExpress, passing the filename of the resource file as the project that ClassExpress should open. This command is only enabled if the String Table editor is running in the right pane of the Browser window.Close Editing
Closes the String Table editor.Edit menu commands
The Edit menu (see Figure 27-18) contains standard editing commands. You can undo operations, and can cut, copy, paste, add, and delete strings. The find commands can help you to locate particular strings in large tables.
[Figure 27-18 String Table editor Edit menu
Undo
Undoes the last String Table editor operation.Redo
Redoes the last String Table editor operation that was undone.Cut
Copies the selected string to the Clipboard, then deletes it from the table.Copy
Copies the selected string to the Clipboard.Paste
Copies the string in the Clipboard into the table.New
Adds a new string to the table.Delete
Deletes the selected string from the table.Find
Opens the Find String dialog box (see Figure 27-19). This dialog box is used to locate a string containing particular text.

[Figure 27-19 Find String dialog box
Type the search text into the Find What textbox. Select Match Case to make the search case sensitive. When you click OK, the String Table editor locates the first occurrence of the text in the string table.
Find Again
Finds the next occurrence of the search text, starting from the currently selected string.Toolbar commands
The String Table editor toolbar (see Figure 27-20) provides quick access to frequently used menu commands.

[Figure 27-20 String Table editor toolbar
- Undo:
- Same as choosing Undo from the Edit menu. Right-click on this button to undo multiple operations at once.
- Redo:
- Same as choosing Redo from the Edit menu. Right-click on this button to redo multiple operations at once.
- Cut:
- Same as choosing Cut from the Edit menu.
- Copy:
- Same as choosing Copy from the Edit menu.
- Paste:
- Same as choosing Paste from the Edit menu.
- New:
- Same as choosing New from the Edit menu.
- Delete:
- Same as choosing Delete from the Edit menu.
- Find:
- Same as choosing Find from the Edit menu.
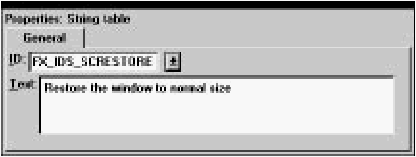
String properties
String properties are shown in Figure 27-21.
[Figure 27-21 String properties
Enter the string in the Text textbox. You can insert tabs and carriage returns by typing Ctrl+Tab and Ctrl+Enter, respectively. You can also use \t to represent a tab and \n for a carriage return.